前言
由于项目越来越大,为了提高程序的稳定性,决定引入单元测试。最后确定使用谷歌googletest开源单元测试框架。本文主要介绍googletest框架属性以及在linux平台编译、简单使用。
单元测试框架的了解(来自知乎):
一、googletest框架简介
C++单元测试框架有cppunit, boost.Test googletest等等,而googletest(简称gtest)是比较丰富并且跨平台。
详细了解这个框架参考官方:https://github.com/google/googletest
平台支持
- Linux
- Mac OS X
- Windows
- Cygwin
- MinGW
- Windows Mobile
- Symbian
- PlatformIO
框架属性
- An xUnit test framework.
- Test discovery.
- A rich set of assertions.
- User-defined assertions.
- Death tests.
- Fatal and non-fatal failures.
- Value-parameterized tests.
- Type-parameterized tests.
- Various options for running the tests.
- XML test report generation.
二、在linux上编译googletest
googletest项目地址:https://github.com/google/googletest
- 下载gtest
我下载了googletest-release-1.8.0版本,解压之后发现包含两个模块:gtest和gmock (googlemock,这个模块使用场景,在一些需要模拟数据的情景下)
- 编译gtest
参考/googletest/README.md文件,提供了三种编译方式: 命令行直接编译、make和cmake。我选择了直接编译。如下所示${GTEST_DIR}变量替换为当前路径googletest目录(尽量使用决定路径)。
直接编译googletest/src/gtest-all.cc文件再打包为静态库。(-pthread 可知gtest是多线程实现)
注意,如果库要移植,需要添加编译选项-fPIC
1 | g++ -isystem ${GTEST_DIR}/include -I${GTEST_DIR} \ |
使用make方式编译
1 | cd ${GTEST_DIR}/make |
使用cmake方式编译, 编译添加gtest_build_samples=ON宏,可以将测试samples编译进来。
最后一句替换为:cmake -Dgtest_build_samples=ON ${GTEST_DIR}
1 | mkdir mybuild |
三、googletest简单使用
gtest自带10个测试用例,非常值得学习:https://github.com/google/googletest/tree/master/googletest/samples
每个测试用例展示主要测试点同:
- Sample #1 shows the basic steps of using googletest to test C++ functions.
- Sample #2 shows a more complex unit test for a class with multiple member functions.
- Sample #3 uses a test fixture.
- Sample #4 teaches you how to use googletest and
googletest.htogether to get the best of both libraries. - Sample #5 puts shared testing logic in a base test fixture, and reuses it in derived fixtures.
- Sample #6 demonstrates type-parameterized tests.
- Sample #7 teaches the basics of value-parameterized tests.
- Sample #8 shows using
Combine()in value-parameterized tests. - Sample #9 shows use of the listener API to modify Google Test’s console output and the use of its reflection API to inspect test results.
- Sample #10 shows use of the listener API to implement a primitive memory leak checker.
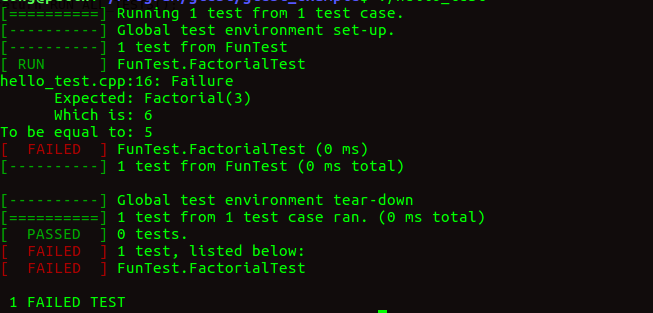
简单测试程序
1 | // hello_test.cpp |
运行结果如下:(效果不错)
四、googletest学习
推荐从源头学习,效率高。
主要参考官网:https://github.com/google/googletest
编译参考:https://github.com/google/googletest/blob/master/googletest/README.md
学习gtest的基本用法:https://github.com/google/googletest/blob/master/googletest/docs/primer.md
学习gtest的高级用法:https://github.com/google/googletest/blob/master/googletest/docs/advanced.md
gtest的10个样例:https://github.com/google/googletest/blob/master/googletest/docs/samples.md
五、小结
本次项目组安排我引入单元测试框架,本次了解分为几个步骤,总的大概花了2天时间完成。
- 了解C++的单元测试框架。(这个过程也看了handy库自己实现了单元测试的源码,对单元测试理解更深)
- 选择googletest测试框架。开源、好用、跨平台。
- 在linux编译googletest
- 学习googletest的基本用法以及测试用例(这个过程时间长一些,将近一天)
- 将googletest引入我们的项目。